
Whilst a good technical SEO is a great means of making your website more visible by boosting SERP (search engine results page) rankings, by implementing tags in your website’s source code you can effectively monitor engagement, and the success of your search optimisation efforts, to predict future consumer trends.
If tags seem a little daunting at first, Google Tag Manager could be for you. It takes out all of the scary coding elements from metadata analysis so that you can get results quickly, without compromising the content or quality of your existing web pages.
What are tags in digital marketing terms?
Less fun than tagging your mates in an Instagram post, but undoubtedly more useful for your business, tags are measurement codes embedded into the webpage’s source code or HTML. They make up what is known as metadata in marketing terms and their purpose is to allow third-party analytics tools (such as Semrush or Clicky) to log connections on its server.
Due to the independent nature of these third-party tools, they are more likely to represent the collected data objectively or impartially. They can also construct a more thorough depiction of where your customer value lies so that you have a better idea of how to tailor your content to a customer base most likely to pay for your products and services. This form of enhanced data analytics also means that you can more accurately predict future behaviour.
These codes are used to extract certain information about how your website is being accessed and used. This information can include:
- How long visitors spend on your site
- Which routes led them to your site
- Which internal links do they click when navigating around your web pages
- Which products they remove from their shopping cart
Typically, you would create a tag for each of these pieces of information separately, known as taxonomies. However, this can be a difficult and laborious process that requires a certain level of knowledge of web coding. That’s where Google Tag Manager comes in.
How Google Tag Manager can help your website
Google Tag Manager is a tag management system (TMS) that allows you to quickly and easily embed and update tags for your website so that you can keep up to date with your web analytics. It works by automatically generating the code for new tags so that all you need to do is embed that new code into your web page’s HTML or Javascript.
This means that you can better understand the level of customer engagement with your brand, from how many people browse through internal backlinks, to how many people fill out your contact form. Ultimately, this will enable you to market your company more effectively and efficiently because you’ve eliminated the time spent writing new codes yourself.
It also means that you can worry less about disrupting functional code and tags already in place within the infrastructure of your website, because Google Tag Manager allows you to install, manage and position marketing tags from within its own software instead of directly into your website code.
By generating codes through a tag management system, you also minimise the possibility of human error while giving your content creators more control over the tags related to the content they’re working on themselves.
So, how do you get started with Google Tag Manager?
Although Google Tag Manager is free to use and install, it is separate from other Google accounts you may use, such as Google Analytics, Gmail or Gsuite.
1. The first thing you need to do is create a new account using the name of your company, your website URL, and which operating system you’re using. Then click “Create”.
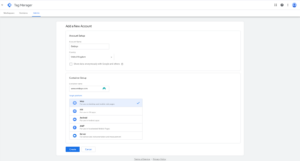
(Source: Google Tag Manager)
2. Next, you’ll be given codes and coding instructions. At this point, you can include the codes in the <head> of your page and after the <body> tag respectively. Or, if you’re not ready to do this yet, you can apply the codes to your website later, they’ll be saved to your dashboard from where you can access them when you need them. After this step, click “ok”.
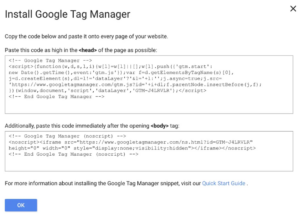
(Source: Google Tag Manager)
3. Now that you have Google Tag Manager installed onto your device and have made sure it’s compatible with your operating system, it’s time for you to set up a tag.
Before you do so, a useful tip to keep in mind going forward is that even though you can create unlimited configurations of tabs, it’s important to organise them properly from the beginning so that you can keep track of different tagging conventions and which pages they’re related to. This is particularly good practice to implement when you want to go in and edit tags in specific topic clusters.
Creating a new tag in Google Tag Manager
1. To create a new tag, simply click “Add a New Tag” in your Google Tag Manager dashboard. This will bring up a “Tag Configuration” box so that you can give it a title and choose a tag type.
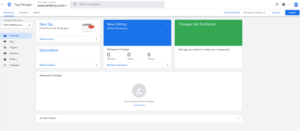
(Source: Google Tag Manager)
2. In order to successfully monitor your website’s performance, you can track your tags through your Google Analytics account. You can do this by inputting your Web Property ID into the tag type configuration on GTM and then selecting a “Track Type” from the drop-down list.
3. Next, you’ll need to choose a trigger in order to specify when you want the tag recorded. This might be every time someone visits a certain page, submits a form, or clicks on a certain link.
To these tags and/or triggers you can add certain variables which essentially monitor what led to that trigger sending a message to your Google Analytics/Google Ads account. A useful example of this would be if someone clicks the email address on your website from the “Careers” page and someone else clicks it from the “About Us” page, you can assume that those two site visitors have different intentions thanks to variables such as page path or click text.
Variables can either be user-defined or built-in. In order to keep the same ID throughout your tags, you’ll need to choose “constant” when you create a new built-in variable in the “user-defined” section.
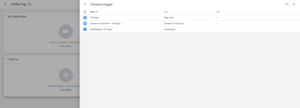
(Source: Google Tag Manager)
4. And that’s it! Once you’ve configured your tag and saved your trigger selection click “save” and activate your tag by clicking “submit”. Until you complete this final stage your tag won’t be functional in your web analytics.
Publishing your tags onto your website
Ok, so…that wasn’t quite it. After you’ve submitted your tag, you’ll be taken to the “Submission Configuration” page. If you’re ready for your tag to go live on your website, you can click “Publish and Create Version”. If not, you can just click “Create version” and this will save the tag in your Google Tag Manager account to embed into your website’s source code when you’re ready.
Tag, you’re it!
Google Tag Manager can be a great tool to speed up your tagging process so you can keep close tabs on current consumer behaviour and predict future trends. It also gives your content creators and marketing team more time to produce star-quality content that’s appropriate for your desired audience, rather than teaching themselves how to code in order to measure website analytics.
To learn more about Tag Manager, get in touch with us today.